Tuesday, March 15, 2022

Whirl & Twirl Sew-Along Block Construction


Whirl & Twirl Sew-Along Block Construction by Thistle Thicket Studio. www.thistlethicketstudio.com

Ready to sew your blocks for the Whirl & Twirl Sew-Along? Here we go!

Blade: Draw a diagonal line on the back of a 2” light fabric square (blade pinwheel). With RST, layer the 2” square on top of the end of the 2” x 9.5” dark rectangle (blade) as shown. Sew on the line, trim seam allowance to ¼” and press toward pinwheel fabric.
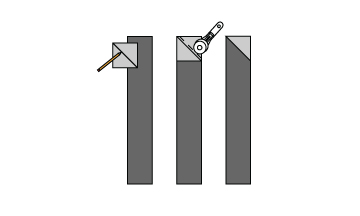
Whirl & Twirl Sew-Along Blade Construction Diagram by Thistle Thicket Studio. www.thistlethicketstudio.com

Large Pinwheel Shadow: Draw a diagonal line on the back of a 3.5” medium solid fabric square (large pinwheel shadow). With RST, layer the square on top of the 3.5” x 9.5” background rectangle as shown. Sew on the line, trim seam allowance to ¼” and press toward pinwheel fabric.

Whirl & Twirl Sew-Along Large Pinwheel Shadow Construction Diagram by Thistle Thicket Studio. www.thistlethicketstudio.com
Large Pinwheel: Draw a diagonal line on the back of a 3.5” medium print fabric square (large pinwheel). With RST, layer the square on top of the pinwheel shadow from the previous step as shown. Sew on the line, trim seam allowance to ¼” and press toward pinwheel fabric.  

Whirl & Twirl Sew-Along Large Pinwheel Construction Diagram by Thistle Thicket Studio. www.thistlethicketstudio.com

Block Assembly: Sew blade section to the left side of a 5” x 9.5” background rectangle, with blade end at the top. Press seam toward background. Sew the large pinwheel section to the right side of the background rectangle with the pinwheel end at the bottom. Press seam toward background. Block should measure 9.5” x 9.5” unfinished (9” x 9” finished). Repeat to make a total of 48 blocks.
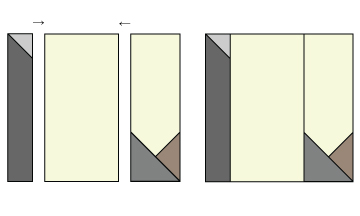
Whirl & Twirl Sew-Along Block Assembly Diagram by Thistle Thicket Studio. www.thistlethicketstudio.com
Next week we will assemble the quilt top!

Happy Quilting!

~Sharla


Whirl & Twirl Sew-Along: Sewing Prep

Whirl & Twirl Sew-Along Sewing Prep by Thistle Thicket Studio. www.thistlethicketstudio.com

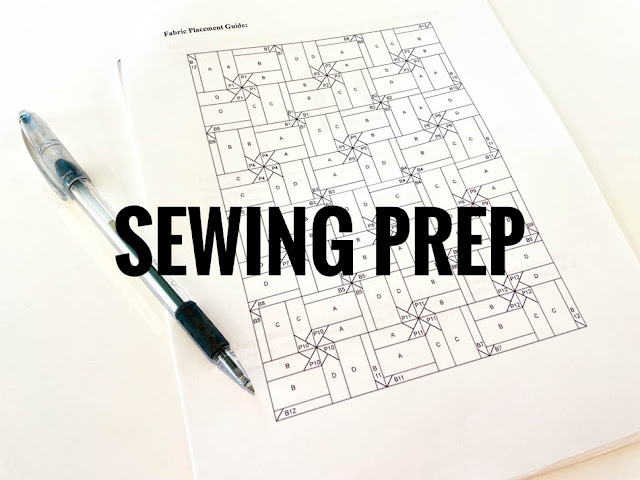
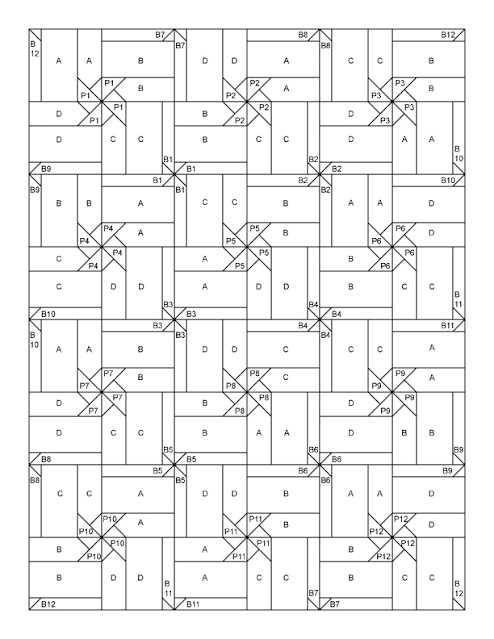
This week, we will be sewing our blocks. Yay!!! But before we start with actual sewing, I thought I'd share some sewing prep information. To help organize the sewing process, I used a chart to identify the placement of the background, blade & large pinwheel fabrics to insure that:

1. Each group of four blocks had a single block using each of the four background fabrics.

2. Each group of four blades that meet to create a small pinwheel used the same fabrics for the blades.

3. Each group of large pinwheels used the same fabric for the pinwheels.

I labeled the placement of each fabric on the chart as follows:

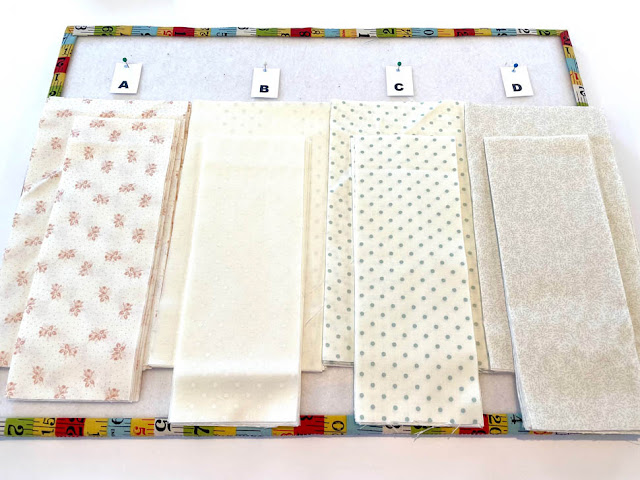
1. Background: A, B, C, D

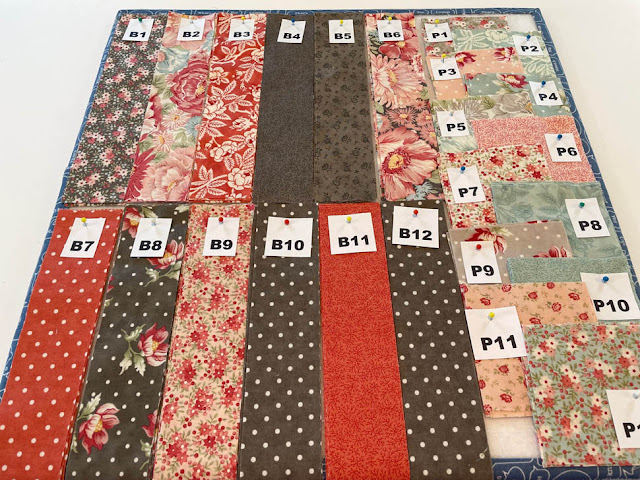
2. Blades: B1 - B12

3. Pinwheels: P1 - P12

Here is the link for the guide: Whirl & Twirl Fabric Placement Guide.

Whirl & Twirl Sew-Along Fabric Placement Guide by Thistle Thicket Studio. www.thistlethicketstudio.com
I lay each group of fabrics out on foam core design boards & then stick a pin through a paper label & fabric to hold it all in place. Of course, for a totally scrappy look, you can just randomly pull fabrics & not worry about following a placement guide.

Whirl & Twirl Sew-Along Fabric Labeling by Thistle Thicket Studio. www.thistlethicketstudio.com

Whirl & Twirl Sew-Along Fabric Labeling by Thistle Thicket Studio. www.thistlethicketstudio.com

I sew in groups of four blocks - Block 1 & 2 in the first row & Block 1 & 2 in the second row make a group (the large pinwheel will become the center of the group). Note: I make the blocks in sets of four but do not sew the four blocks together.

There is only one block to make in this quilt. The blocks are rotated to create the design.

I'll share the sewing directions in the next post, so stay tuned!

Happy Quilting!

~Sharla


Monday, March 7, 2022

Whirl & Twirl Sew-Along: Fabric Cutting

Whirl & Twirl Sew-Along: Fabric Cutting by Thistle Thicket Studio. www.thistlethicketstudio.com
Surprise! I'm posting the fabric cutting instructions a day early since I have a conflict tomorrow and won't be able to post. So here you go.....


Layer Cake Fabric Cutting

Let's start with the layer cake! Yum, I love cake! Especially anything chocolate - and Moda! What's your favorite cake? 

Separate your layer cake squares into the following:

  • 12 dark-valued squares
  • 12 medium-valued squares
  • 2 light-valued squares. They should contrast with the background fabrics.
The remaining squares can be used on the back for a pieced backing, for coordinating pillows or for another project.

From each of the 12 dark-valued squares, cut:

-4 - 2” x 9.5” rectangles for blades for a total of 48

From each of the 12 medium-valued squares, cut:

-4 - 3.5” x 3.5” squares for large pinwheels for a total of 48

From each of the 2 light-valued squares, cut:

-24 - 2” x 2” squares for blade pinwheels for a total of 48


Background Fabric Cutting

From each 7/8 yard of background fabric, cut:

-3 - 9.5” x WOF strips for a total of 12 strips

From each set of 3 strips, subcut:

-12 - 5” x 9.5” rectangles for a total of 48

-12 - 3.5” x 9.5” rectangles for a total of 48

Notes:

-WOF = Width of Fabric

-For even scrappier backgrounds, select the leftover light-valued low-volume print squares from the layer cake for some of the background. From each square, cut: 

 -1 - 5” x 9.5” rectangle

 -1 - 3.5” x 9.5” rectangle


Pinwheel Shadows, Border, Binding & Backing Cutting

From the 1/2 yard of medium fabric for large pinwheel shadows, cut: 

-4 - 3.5” x WOF strips

From the 4 strips, subcut:

-48 - 3.5” x 3.5” squares

From the 1 yard of border fabric, cut:

-7 - 4.5” x WOF strips

 From the 2/3 yard of binding fabric, cut: 

-8 - 2.5” x WOF strips

From the 4 yards of backing fabric, cut:

-2 - 72” x WOF pieces


That's it for cutting! Let's meet back here next week for the block construction instructions. Boy, that's a tongue twister! Say that three times fast!

Happy Quilting

~Sharla 


Tuesday, March 1, 2022

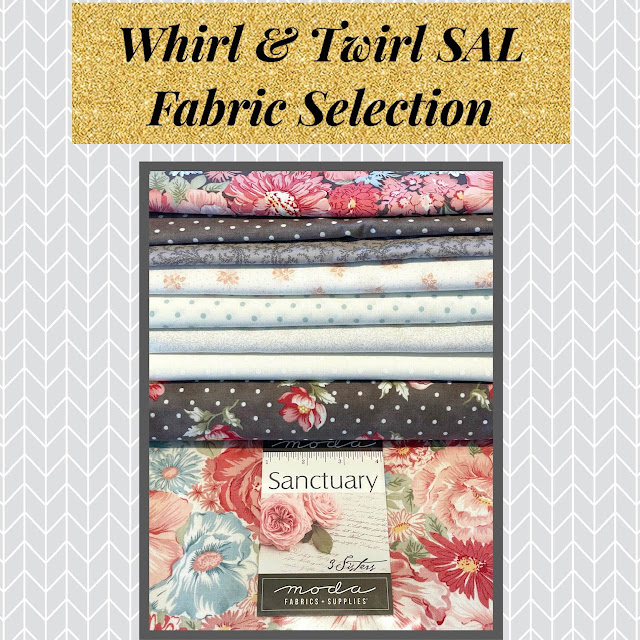
Whirl & Twirl Sew Along: Fabric Selection

Today is the day! We're kicking off the Whirl & Twirl Sew-Along with fabric selection. So hit your stash or hit the store to find your favorite layer cake and coordinating fabrics. Because I live in a rural area and I know how hard it can be to get fabric in a timely matter, I'm allowing everyone a week for this first step.

You will need:

  • 1 layer cake
  • 7/8 yard each of 4 low volume prints for background
  • 1/2 yard medium solid (or reads as a solid) fabric for large pinwheels
  • 1 yard fabric for border
  • 2/3 yard fabric for binding
  • 4 yards fabric for backing
When selecting a layer cake, choose one that has at least 12 dark-valued squares and 12 medium-valued squares. You'll have some leftover squares that can be used in the backing if you like (I love a pieced backing!).

This quilt is a nice throw-size at 62" x 80". Next week I'll share cutting instructions. Can't wait to see what fabric everyone uses!

Happy Quilting!
~Sharla


Thursday, February 24, 2022

Free March Sew Along

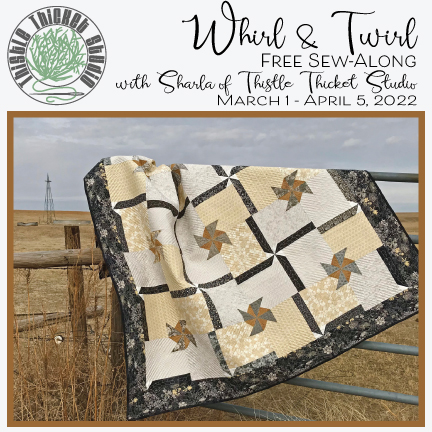
Whirl & Twirl Sew Along by Thistle Thicket Studio. www.thistlethicketstudio.com
WooHoo! To celebrate the release of the Moda Bake Shop Book "Did Someone Say Cake" and the upcoming release of the Moda Bake Shop Book "Rollin Along", I am hosting my first sew-along on Instagram and Facebook in March!!

I'm excited to share this quilt that I designed using a layer cake and extra yardage for the background and border. I'll be sharing all the details and instructions on how to make this quilt on my social media platforms, so be sure to follow Thistle Thicket Studio on Facebook and/or @thistlethicketstudio on Instagram!

The schedule for the free sew-along is:

Week 1 / March 1: Fabric Selection

Week 2 / March 8: Fabric Cutting

Week 3 / March 15: Block Construction

Week 4 / March 22: Quilt Top Assembly

Week 5 / March 29: Finishing The Quilt

Week 6 / April 5: Celebration!

Of course, there will be a book giveaway or two along the way to encourage you to join in the fun! 

Happy Quilting!

~Sharla


Wednesday, January 26, 2022

First Quilt Finish of 2022

Rescued Quilt Blocks Quilt by Thistle Thicket Studio. www.thistlethicketstudio.com
I've got my mojo back and I've been sewing like crazy this January. Besides some serious secret sewing, I made a charity/compassion quilt for our quilt guild. Our guild gives a quilt to anyone in our community that loses their home in a fire. In December, we had three houses lost in prairie fires during an 80+ mph wind storm. Needless to say, the guild wasn't prepared with enough quilts. 

Compassion Quilt by Thistle Thicket Studio. www.thistlethicketstudio.com
My mom had rescued some sampler blocks at a thrift store from an area quilt shop's block of the month and had donated them to the guild. I took those blocks, completed those that weren't finished and fixed a couple, then sashed the blocks to make a quilt. The blocks were scrappy but luckily my stash of Kansas Troubles fabrics blended well with the block fabrics.

Compassion Quilt by Thistle Thicket Studio. www.thistlethicketstudio.com
I quilted an all over design of feathers on this quilt and it turned out quite nice, if I do say so myself. It will make a nice throw-sized quilt for someone in need of comfort.

Stars & Bars QOV Quilt Made By Thistle Thicket Studio. www.thistlethicketstudio.com
In addition to finishing this compassion quilt, I also dug out a couple of Quilts of Valor quilts that I committed to make for our area QOV chapter. One was a kit that the chapter gave for me to make (way to long ago to admit) and one was a stack of scrappy rail fence blocks I had made a couple of years ago.

Fence Rail QOV Quilt by Thistle Thicket Studio. www.thistlethicketstudio.com
Both tops are ready to be quilted as soon as I finish my secret sewing project to meet a deadline. I'll share the finished quilts when they are completed. 

2022 Stash Buster Challenge Blocks by Thistle Thicket Studio. www.thistlethicketstudio.com
I also started the 2022 Stash Buster Challenge by Border Creek Station. Why, I have no idea as I have more than enough projects that are already started! But this block is fun and easy to make so I've been making a block after I get a step completed in my secret sewing. Kind of a treat! I'm using my stash of 30s fabrics and dotted backgrounds for this project. The center square and corner stones in each block will be the same green print to pull it all together.

What projects have you been working on in the new year? I'd love to hear about them!

Happy Quilting

~Sharla


Saturday, January 1, 2022

Saying Goodbye To 2021

The holidays are always rushed and I never seem to have time to do everything I want to do. This year was no different. I didn't have time to do as much decorating as I wanted to or as much baking (although the hubby and I don't need the extra calories) or as much holiday crafting. One thing that was not on my list this year was buying Christmas presents as we decided to opt for a family vacation the week of Thanksgiving in lieu of gifts (except for the grandkids). Because our kids spent their Thanksgiving with us, that meant they spent Christmas with their inlaws - which made for a quieter Christmas for the hubby and I, although my brother and family was home for the holidays.

To close out the year, I thought I'd share a few photos of some of my Christmas decorations.

Christmas At Thistle Thicket Studio. www.thistlethicketstudio.com
This year I was very excited to get to use my new Fiesta Ware lightbulb dishes along with the "A Lightbulb Moment" placemats and table runner I designed last year.

Christmas At Thistle Thicket Studio. www.thistlethicketstudio.com
This Santa pitcher was a new acquisition in 2021 and he looked so cute in my tablescape.

Christmas At Thistle Thicket Studio. www.thistlethicketstudio.com
My Santa mug collection continues to grow. I just love them paired with my Fiesta Ware lightbulb plates.

Christmas At Thistle Thicket Studio. www.thistlethicketstudio.com
Jars filled with vintage ornaments and vintage Christmas lightbulbs graced my tablescape.

Christmas At Thistle Thicket Studio. www.thistlethicketstudio.com
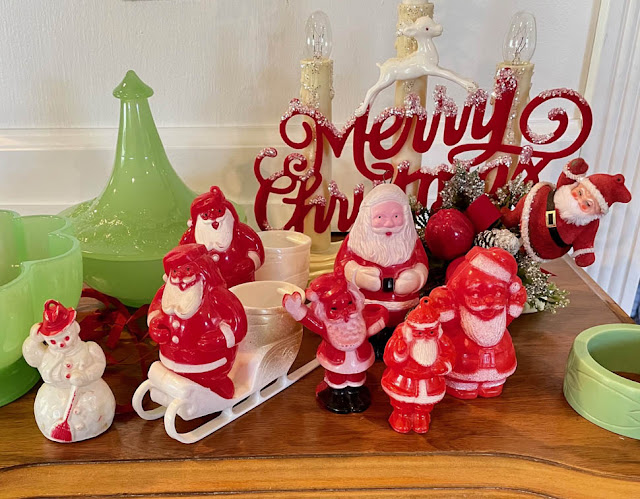
A few of my vintage plastic Santas and a vintage candolier that I decorated with vintage plastic Christmas items. I love them mixed in with a few pieces of jadeite.

Christmas At Thistle Thicket Studio. www.thistlethicketstudio.com
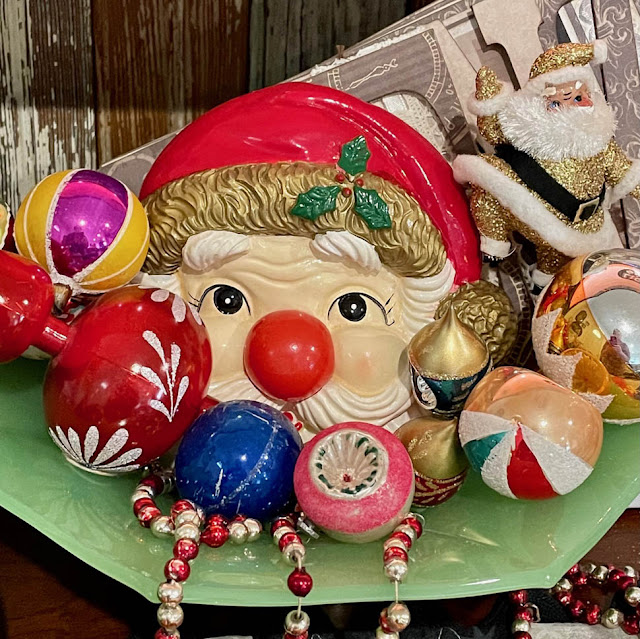
A jadeite dish filled with vintage ornaments. Press the red nose of Santa and it lights up and plays Christmas music.

Christmas At Thistle Thicket Studio. www.thistlethicketstudio.com
More vintage Christmas ornaments in a jadeite bowl. Love this vintage Santa even if his nose is a little crinkled.

Christmas At Thistle Thicket Studio. www.thistlethicketstudio.com
A few of my Santa mugs along with a few of my vintage milk glass Christmas figural lightbulbs, and of course, more vintage ornaments.

Christmas At Thistle Thicket Studio. www.thistlethicketstudio.com
I found this string of Santa lights a few weeks ago at a thrift shop. They almost match my two plastic Santa head ornaments I found last year.

Christmas At Thistle Thicket Studio. www.thistlethicketstudio.com
Since I had no presents for under the Christmas tree, I wrapped a couple of birthday presents that were in the closet. I didn't really miss the packages with all these cute blow mold Santas and Snowmen under the tree. My tree this year was filled with lightbulb shaped ornaments to go with my "A Lightbulb Moment" tree skirt, etc. I made last year.

Christmas At Thistle Thicket Studio. www.thistlethicketstudio.com
This is my "A Lightbulb Moment" quilt that was published in the Best of Moda Bake Shop book last year. It's still available at Martingale Publishing if you're interested.

https://www.shopmartingale.com/best-of-moda-bake-shop.html
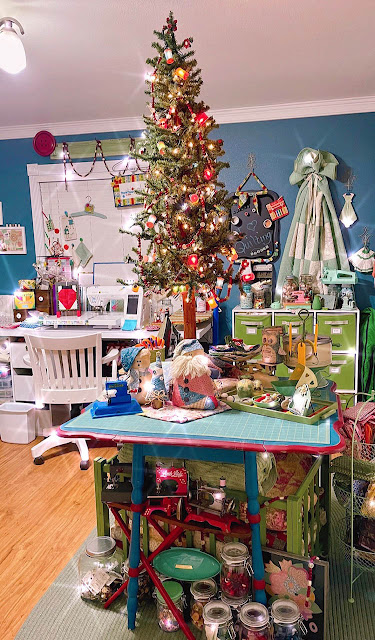
I even managed to get my sewing studio semi-cleaned so I put up a Christmas tree to celebrate.

Christmas At Thistle Thicket Studio. www.thistlethicketstudio.com
I managed to get a couple of projects completed during the holidays. I bought four framed cross stitch seasonal scenes with the intention of making them into pillows. I got the winter scene made into a pillow, while the rest are on my to-do list.

Christmas At Thistle Thicket Studio. www.thistlethicketstudio.com
The only crafting I managed to do was turning this cute little deer I picked up at a thrift shop for 25 cents and a vintage jello mold into an ornament.

Christmas At Thistle Thicket Studio. www.thistlethicketstudio.com
Didn't he turn out cute? I had plans to make Christmas bells from some other jello molds I bought this fall but it didn't happen. Maybe I'll do it before I pack all my Christmas away so they'll be ready for next year.

As we welcome a new year, I wish for all of you a happy and health year filled with quilting, crafting and thrifting with friends!

Happy New Year!

~Sharla