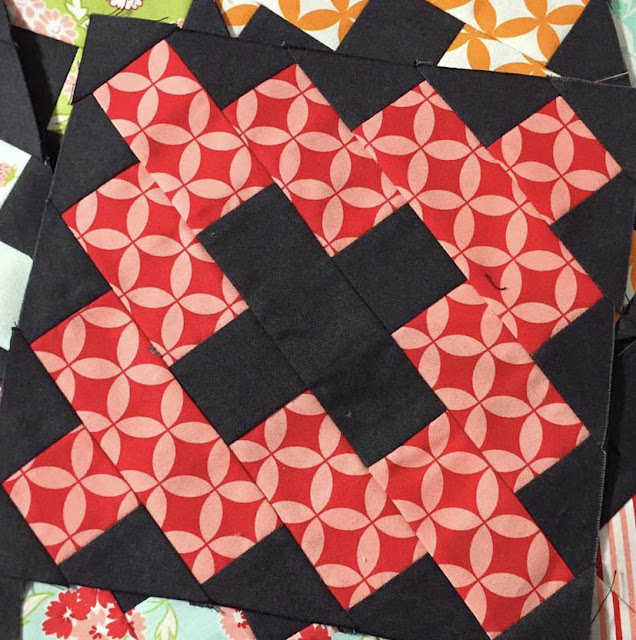
It's here! The first block has been sent out to my 131 subscribers for my first mystery sew along! I'm excited to kick off this new adventure and I'm thrilled to introduce the first block - the Holly Block.
The Holly Block is an easy sewing 12.5" x 12.5" block with two slight variations. As you can see in this block, the berries have a more round appearance. This is achieved by sewing a small square of background fabric on the diagonal in each of the corners of the berry square. It's hard to see in this block, but I'm making this variation with a scrappy background of assorted white-on-white prints.
Those small squares created extra bulk on this flannel block so I elected not to make the berries round. Gives it a more modern feel, I think. The two variations are included in the pattern. As I said, this variation is made with flannel and is actually one that I purchased fabric for rather than using scraps. That directional background may be a challenge! I purchased 2 1/2 yards of the background and that should be enough to do the quilt plus the Bonus Borders.
I think the pattern is pretty self-explanatory so I don't have any additional tips or tricks with this block - except to be sure to square up your leaf blocks before sewing it all together. However, I'd love to hear feedback from those who are participating on what you think of the pattern directions and illustrations.
Thanks everyone who registered and have a scrappy happy day!
~Sharla
Saturday, January 19, 2019
Monday, January 14, 2019
2019 Finish-A-Long Q1 Goals
It's a new year and time for new goals for the Finish-A-Long! Not familiar with the Finish-A-Long? Then check out my FAL page at the top of my blog or click here. I've participated in the FAL for a few years and this year I'm pleased to be one of the co-hosts, so I hope you'll join me and get a few of your UFOs finished this quarter!
#1 - Quilts of Valor Quilt: This is a must finish for me this quarter. I joined our newly formed QOV group last summer and still haven't gotten a quilt made for them - and I'm feeling really guilty. This small group of women have already made and presented more than 2 dozen quilts in their first few months and I haven't held up my end. I actually have started this quilt and have approximately a third of the blocks completed so hopefully I can get it finished before we head south for a few weeks.
#2 - Frivols Kindred Quilt: I haven't worked on this one for more than a year, but I have more than half of the blocks completed so after I get my QOV quilt finished I want to knock this one out.
#3 - Just the Atoms Quilt: I started this one with the scrap fabrics from my Molecules of Moda quilt as a keepsake of that quilt which was sold to Moda's Mark Dunn. It would be nice to get this one done but might be more than I can get done this quarter knowing my other obligations.
#4 - Modern Marks Quilt: I haven't touched this since arriving home from our winter travels last year. This is a simple design and shouldn't take too long to make if I just put my mind to it. This will probably be a donation quilt to a child advocacy group in our area depending on what size it ends up being.
Well, there you have it. Four goals that should be doable but I know life always seems to get in the way (or one of those squirrels entices me to start a new quilt project!). But there's no harm in setting goals and working towards them and that's the whole point of the Finish-A-Long. What doesn't get done this quarter can always be moved to the next quarter - no penalties! And what does get done can be eligible for some great prizes (well, for you if you join in but not for me since I'm one of the hosts). There's only a few more days to get your Q1 goals posted so don't dally! Deadline is Jan. 18. I'll be linking this post up with the FAL Q1 Link Up.
~Sharla
#1 - Quilts of Valor Quilt: This is a must finish for me this quarter. I joined our newly formed QOV group last summer and still haven't gotten a quilt made for them - and I'm feeling really guilty. This small group of women have already made and presented more than 2 dozen quilts in their first few months and I haven't held up my end. I actually have started this quilt and have approximately a third of the blocks completed so hopefully I can get it finished before we head south for a few weeks.
#3 - Just the Atoms Quilt: I started this one with the scrap fabrics from my Molecules of Moda quilt as a keepsake of that quilt which was sold to Moda's Mark Dunn. It would be nice to get this one done but might be more than I can get done this quarter knowing my other obligations.
#4 - Modern Marks Quilt: I haven't touched this since arriving home from our winter travels last year. This is a simple design and shouldn't take too long to make if I just put my mind to it. This will probably be a donation quilt to a child advocacy group in our area depending on what size it ends up being.
Well, there you have it. Four goals that should be doable but I know life always seems to get in the way (or one of those squirrels entices me to start a new quilt project!). But there's no harm in setting goals and working towards them and that's the whole point of the Finish-A-Long. What doesn't get done this quarter can always be moved to the next quarter - no penalties! And what does get done can be eligible for some great prizes (well, for you if you join in but not for me since I'm one of the hosts). There's only a few more days to get your Q1 goals posted so don't dally! Deadline is Jan. 18. I'll be linking this post up with the FAL Q1 Link Up.
~Sharla
Friday, January 11, 2019
Confetti Quilts
As of the beginning of the year, my mom and I assumed roles as the officers of our local quilt guild (me - president, she - secretary/treasurer). We've been doing lots of planning and yesterday was our first month's meeting. One of the things we planned was to get everyone's creative juices flowing by making confetti mini quilts. Although it made for a long evening, I think those that participated had fun.
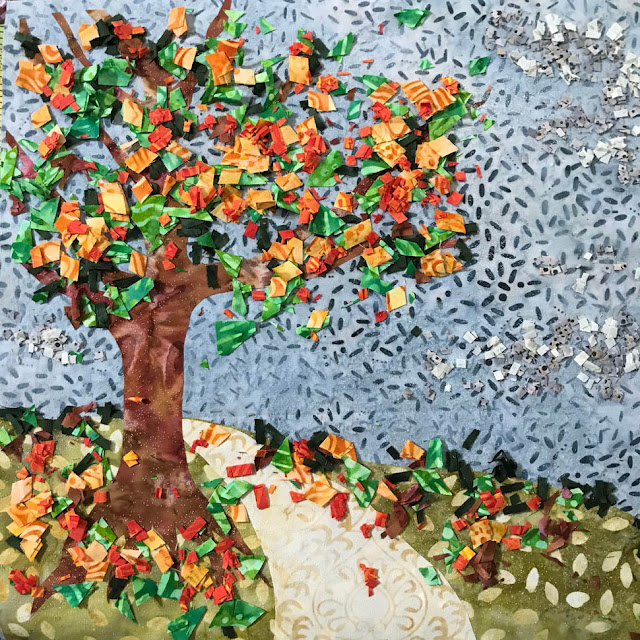
Have you made a confetti quilt? They are really quite easy and fun to do - and you don't have to be a fine artist to make a beautiful quilt. I snapped a few photos as I made my class sample so I thought I'd share how I made my confetti quilt.
I chose to make a fall scene of a tree with falling leaves because I thought it would be the easiest for the participants to make. I used batiks in the making of my quilt because the 'confetti' needs to be from fabrics that are the same color on both sides. Solid woven fabrics will work also.
I selected a light blue-gray fat quarter for my background and cut it into a 12.5" square. I then drew a design for my foreground elements of the ground, path and tree trunk/branches on to paper backed fusible web and fused the shapes to my selected batik fabrics. I cut them out and then fused them to my background fabric.
It was then time to make my confetti! I selected a range of colors from dark green to bright gold to create dimension in my quilt. I cut my confetti into different shapes to add different textures. For some, I used a ruler to cut little strips and then cross cut the strips into little squares, triangles and rectangles. Then for others, I just put a pile of scraps on my cutting board and started running my rotary cutter across the scraps cutting free-form shapes. Ribbons and specialty yarns can be used to add additional texture in the confetti.
Before beginning to place my confetti on my background, I sprinkled a powder adhesive called Bo Nash on my fabric in the areas that I was going to place my confetti. The powder, when pressed with a hot iron, helps fuse the confetti to the background to stabilize it for quilting. After the powder adhesive was applied, I began placing my confetti starting with the darkest color first, then layering each color from darkest to lightest. This help creates depth in the quilt because the darker elements recede while the lighter elements appear to be closer.
Once I had my confetti in place, I very lightly sprinkled a little more powder adhesive on top of the confetti, then placed a piece of tulle netting over the entire quilt top. Placing a silicone pressing sheet over the entire surface, I pressed it using an iron on a wool setting and no steam. The iron should be hot enough to activate the powder adhesive but not so hot that it melts the netting. The powder adhesive holds everything in place enough to be able to quilt the piece.
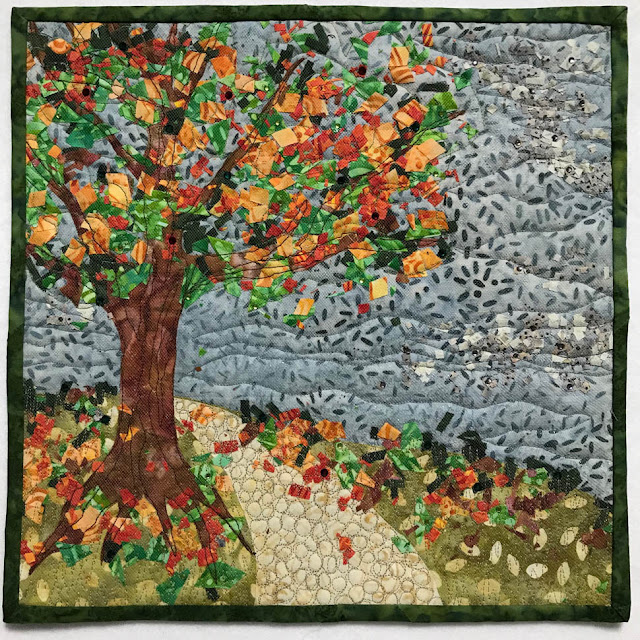
I layered my top, batting and backing and set out to quilt this on my domestic sewing machine. I used Thermore for my batting because it is thin. Although my machine does not like to do free motion quilting, I tried it on this quilt. I had some issues with skipped stitches and had to do some ripping, but I finally adjusted the tension enough so that the skipped stitches were seldom and not noticeable. I'm not a freehand quilter, but I was pretty pleased with my quilting on this.
I finished off my quilt by placing some hot fix crystals on top of the quilt in red, dark green and light green in the leaf areas to add a bit of interest (and because they were just lying around, left over from another quilt project).
Ta-Da! I have a new quilt to add to my mini quilt wall! It was a fun little project and really easy to do. The hardest part was hand sewing the batik binding to the batik backing with the dense quilting! If you try your hand at making a confetti quilt, I hope you'll come back and share it with me!
~Sharla
Thursday, January 10, 2019
Finish-A-Long Q1 Goals Linkup
Happy New Year, everyone! It is time for a NEW round of the Finish-A-Long (FAL)!
As you can see, a new round of the Finish-A-Long is starting today. New logos (thank you so much, Marci), some new hosts like me (and some familiar ones), some new sponsors as well as some we have known for years now. Presumably we will have some new participants as well as many who have been taking part regularly for a long time...
So let's get to it!
You can now link up your list of projects that you want to finish in Quarter 1 of 2019. We are hoping that the FAL community will inspire you to work on your unfinished projects this quarter, and to get them finished!
Our 2019 Finish-A-Long Hosts
The 2019 FAL is hosted by a great community of bloggers. This year our hosts are:
- Sandra - Sew of Course - Ireland
- Marci - Marci Girl Designs - USA Louisiana
- Leanne - She Can Quilt - Canada
- Ella - Throw a Wench in the Works - USA Georgia
- Karen - Capitola Quilter - USA California
- Lynne - Tinking Along - USA Maryland
- Izzy - Dizzy Quilts - Canada
- Sarah G - Sarah Goer Quilts - USA California
- Sarah Z - Cedar Fork Stitches - USA Montana
- Julie - That’s Sew Julie - USA Iowa
- Sharla - Thistle Thicket Studio - USA Kansas
- Nicole - Handwrought Quilts - Canada
For those of you who are new to the FAL, here is an explanation: The Finish-A-Long is a community aiming to motivate and encourage each other to complete those unfinished projects that are hanging around, sometimes for far too long. At the start of the quarter you post and link up a list of projects you hope to finish in the next three months. Then, at the end of the quarter, you link up each successful finish from your original list.
Each linked up finish is an entry into the draw for wonderful prizes from our sponsors. There is no penalty for not finishing a listed project, so feel free to make your list as long or as short as you wish. The 2019 Schedule and Rules for the FAL are on my permanent 2019 FAL page, let me know if you have any questions.
Our 2019 Finish-A-Long Sponsors
Here are the fantastic and generous sponsors for Q1 of the Finish-A-Long. you can see each of their prizes listed under their logo. Please think about visiting them and saying thank you for their their support of the FAL.
Winner's Choice of 1 Large 12 Spool Collection |
$80 Gift Certificate |

$50 Gift Certificate |

$50 Gift Certificate |
$25 Gift Certificate |

3 PDF Patterns |

2 PDF Patterns |

2 PDF Patterns |

1 Six Month Subscription |
2 PDF Patterns |

$30 Fabric Voucher |
|
Make your Q1 List of Unfinished Projects
So now it is time to sort out the projects/UFOs/WIPs that you want to finish over the next three months. Take a photo of each one and make your list. If you like you can use our Finish-A-Long Planner to list your projects and keep track of progress. It also has all link-up dates for the year, and the hashtags that we would use. Or use any method that works for you. Please ensure that you have at least STARTED your projects - pulled fabric with a pattern is considered a project started - and remember it is only a FINISHED project that will get you an entry toward the above listed prizes. So while we love to see your bee blocks, the "finish" is when they are a completed, usable project.
Post Your Q1 List
Post your list either on your blog, on Instagram, or on Flickr if you prefer. If posting on social media (Flickr, Instagram), it will be very helpful if you tag your list with #2019FALQ1yourname (where yourname is unique to you). Using the same hashtag over the quarter when sharing project progress or finishes helps the host to make the connection to your original list quickly and easily.
IMPORTANT: Don't forget to link up your finishes at the end of the quarter! We will be posting a reminder on the blog and on Instagram, but do keep an eye out...
Link-up Your Q1 List
The 2019 Q1 link for your list of proposed finishes is now open below, on my blog and on each of the hosting blogs. You need only link your list once, on ONE host blog, and the link will show up on all the host blogs. If you are using Flickr or Instagram, post a mosaic of your projects and put your list in the description. Don't forget to include your unique hashtag.
If you need a little help, Katy of The Littlest Thistle has a great tutorial on how to link up if you need it, and Marci has a post on how to link up from Instagram.
Join the FAL Community
We also ask that you become part of the FAL community. Please check out the links of others - visit and comment on their lists. We all need encouragement to get those finishes done, so please share some of your own too.
If you want you can follow us on Facebook: Finish-A-Long and/or on Instagram: @finishalong, too. We'll post encouragement during the quarter and reminders when the finishes link up opens at the end of the quarter.
When creating your list there is one thing to remember - No deductions for not completing something so - Aim High! Nothing to lose!! Well now, get that list together and get linked up.
LET THE FUN BEGIN!
Feel free to use and share the FAL button at the top and this one too:
Remember: you only need to link up at ONE hosting blog and it will automatically show up on all hosting blogs.
Sunday, January 6, 2019
A Scrappy Happy Holidays Mystery Sew Along!
*Note: Subscription for this Mystery Sew Along has closed.
I'm excited to announce that I will be hosting a mystery sew along throughout 2019! You may have noticed a new pop up when you arrived at my blog. If you sign up through that pop up you'll automatically be subscribed to A Scrappy Happy Holidays Mystery Sew Along!
This is the first time I've ever tried to do something like this through my blog so I hope you'll bear with me while I try to navigate the technology side of setting up a mailing list and other techy stuff.
Although I'm still finalizing all the details, here's what I know now:
- This sew along will be a mystery. You will not know what the finished quilt will look like until the end of the sew along.
- This sew along has a Christmas theme.
- The quilt will finish as a 54" x 54" table topper or wallhanging.
- A Bonus Border pattern will be provided at the end to enlarge the quilt to 72" x 72" if desired.
- This quilt was designed to use scraps. You'll want at least four different colors of scraps plus background. I used red, green, blue and gold when designing the quilt.
- You'll receive a pattern each month (January - November) with instructions to complete a block or section in the quilt. Patterns will be sent out some time in the later half of the month (specific date yet to be determined).
- There is no cost to join the sew along.
- Only positive conversations/comments are welcome. If I make a mistake somewhere or you would like to suggest a better way for me to host this sew along, please notify me in a pleasant and positive way. As I said earlier, this is a first for me so I'm sure there will be some glitches but I will try my very best to make this a fun sew along!
I hope you'll join me for A Scrappy Happy Holiday Mystery in 2019!
~Sharla
Wednesday, January 2, 2019
2019 Finish-A-Long Sponsors Announced
I'm thrilled to share the sponsors for the 2019 Finish-A-Long. The Finish-A-Long is a great way to motivate yourself to finish up those languishing UFOs you have lying around your sewing room. And it's even more motivation with the awesome prizes from these sponsors!

Winner's Choice of 1 Large 12 Spool Collection |

$80 Gift Certificate |

$50 Gift Certificate |

$50 Gift Certificate |

$25 Gift Certificate |

3 PDF Patterns |

2 PDF Patterns |

2 PDF Patterns |

1 Six Month Subscription |

2 PDF Patterns |

$30 Fabric Voucher |
 |
For all the details about the FAL, check out my 2019 Finish-A-Long page. I hope you'll join us and get motivated to finish your UFOs in 2019! Start making your list, the 2019 Q1 link up opens January 10!
~Sharla
Subscribe to:
Comments (Atom)


