Showing posts with label Patterns & Tutorials. Show all posts

Monday, September 25, 2023

Ciara Quilt In Green

Ciara Quilt Pattern Designed & Made By Thistle Thicket Studio. www.thistlethicketstudio.com
I've been very busy working on new samples of a couple of my patterns in preparation for a trunk show I am presenting in October to the Greater Kansas City Quilt Guild. I'm making new samples because I gave the original samples as gifts. Note to self: don't do that in the future!

I was excited to remake the Ciara quilt in this 50s green color (my fav color). It's so vintage yet so modern! This one is definitely staying in my possession. I've made three of these quilts now - a gray and cream version; a red, white and blue version; and now this green and white version. This quilt is so fun to make and really goes together quickly. 

Get your Ciara quilt pattern by visiting my shop --- CLICK HERE. I would love to see your version of Ciara if you make one!

Happy Quilting!

~Sharla


Monday, August 21, 2023

It's My Birthday Sale!

It's My Birthday Sale at Thistle Thicket Studio. www.thistlethicketstudio.com
It's August and that can mean only one thing.....It's My Birthday Sale!!! My birthday is on the 27th so all of my quilt patterns in my shop at www.ThistleThicketStudio.com are 27% off. The sale runs through August so don't let the time slip by without checking it out. 

~Happy Quilting!

Sharla


Saturday, July 15, 2023

Turning Point Is Finally Here!!!

I am so thrilled to finally announce the launch of my latest quilt pattern called Turning Point! 

Turning Point Quilt Designed by Thistle Thicket Studio. www.thistlethicketstudio.com
This modern quilt is graphic and eye-catching. With just two bundles of 1 1/2" pre-cut strips and some yardage, you can make both Turning Point quilts featured in this pattern, a throw-size and a full-size quilt in a light and dark colorway!

Turning Point Quilt Designed by Thistle Thicket Studio. www.thistlethicketstudio.com
The throw quilt is 64" x 76".

Turning Point Quilt Designed by Thistle Thicket Studio. www.thistlethicketstudio.com
The full-size quilt is 76" x 88".

What I love about this quilt is that the strip piecing makes the construction a breeze. 

Turning Point Quilt Bonus Pillow Pattern Designed by Thistle Thicket Studio. www.thistlethicketstudio.com
The pattern also includes a bonus pillow pattern and instructions for a pieced backing.

Turning Point Quilt Pattern Designed by Thistle Thicket Studio. www.thistlethicketstudio.com
Get your Turning Point digital quilt pattern HERE.

Customize this quilt with any colors you desire and make it your own. I can't wait to see your version of the Turning Point quilt!

~Happy Quilting!

Sharla


Sunday, February 5, 2023

Introducing Mansu....

I am sew excited to introduce to you my newest quilt pattern! Mansu is named after my daughter-in-law and features a one-block design that when combined with multiple blocks creates this bold and vibrant quilt.

Mansu Quilt Pattern by Thistle Thicket Studio. www.thistlethicketstudio.com
Mansu measures 80" x 80" and I made my test quilt using Slow Stroll by Fancy That Design House for Moda Fabrics.

Mansu Quilt Pattern by Thistle Thicket Studio. www.thistlethicketstudio.com
The lattice and stars in this quilt were just screaming for custom quilting and I am in love with the lines that radiate from the stars and the circle design in the lattice. But this quilt would look just as great with a fun modern edge-2-edge design.

Mansu Quilt Pattern by Thistle Thicket Studio. www.thistlethicketstudio.com
The Mansu quilt pattern can be purchased as a digital download on my pattern website at www.thistlethicketstudio.com. And you can save 20% if you purchase the pattern during my Pattern Release Week Special through Monday, February 13, 2023.

Mansu Quilt Pattern by Thistle Thicket Studio. www.thistlethicketstudio.com
While your there, check out my other patterns. And stay tuned, I'm already working on my next quilt design!

Happy Quilting

~Sharla


Monday, January 23, 2023

More Reverse Applique Pillows

Here it is, already nearing the end of January!! And I'm still looking back at photos I haven't shared from the holidays. I realized I never shared the reverse applique pillows that I made for our family gift exchange. I really got in a sewing kick and made several pillows this year.

Lightbulb Reverse Applique Pillow Pattern by Thistle Thicket Studio. www.thistlethicketstudio.com

I shared a free reverse applique Christmas Lights pillow pattern on my website as a Christmas gift for my followers and these pillows were all made with the same instructions, just different designs that I found on free clipart sites.

Christmas Tree Reverse Applique Pillow by Thistle Thicket Studio. www.thistlethicketstudio.com

I made a set of six pillows for various holidays/seasons throughout the year. Each of the background fabrics are strips of various widths pieced together.

Snowflake Reverse Applique Pillow by Thistle Thicket Studio. www.thistlethicketstudio.com

The pillows are all 12" square so they can use the same pillow insert. That makes it easier to store the pillow covers flat and they take up less space.

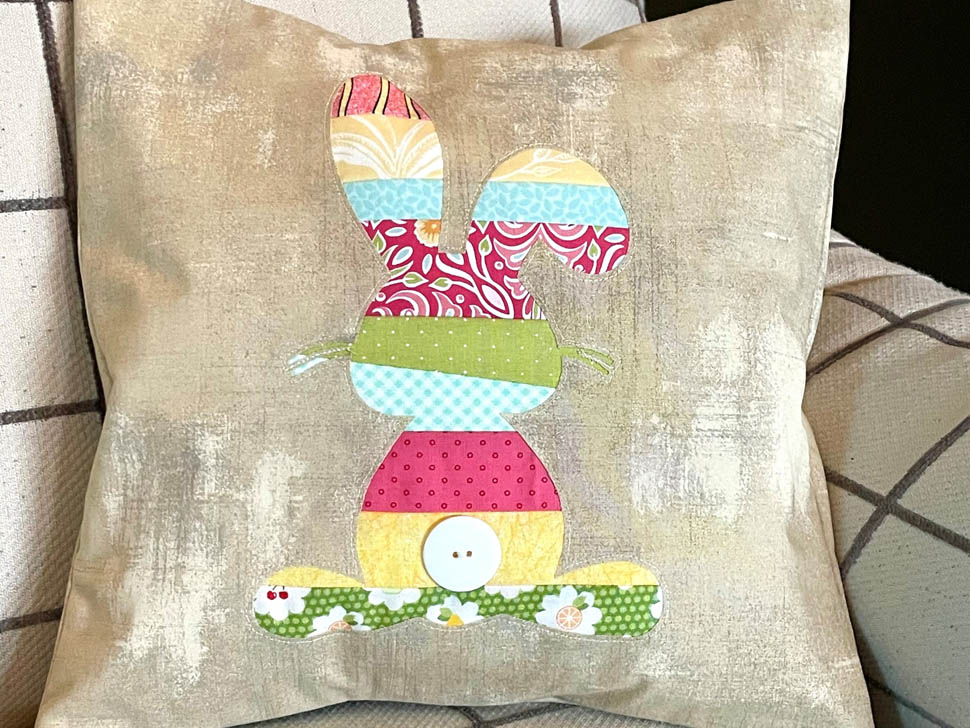
Easter Bunny Reverse Applique Pillow by Thistle Thicket Studio. www.thistlethicketstudio.com

I just love this Easter bunny pillow with his button tail.

4th of July Reverse Applique Pillow by Thistle Thicket Studio. www.thistlethicketstudio.com

I really like using Moda Grunge fabrics for the pillow fabric because it's a heavier fabric with the added paint on the surface so the background fabrics don't show through as easily. If they do, I just trim the excess away after I have machine stitched around each applique opening.

Fall Leaf Reverse Applique Pillow by Thistle Thicket Studio. www.thistlethicketstudio.com

I made several different fall leaf pillows last fall for demos for the two quilting groups I belong to. 

Jack-o-lantern Reverse Applique Pillow by Thistle Thicket Studio. www.thistlethicketstudio.com

On the jack-o'-lantern pillow, I appliqued the face on top of the reverse applique using black felt. I also appliqued the leaf using corduroy.
 
All Hearts Come Home For Christmas Pillow by Thistle Thicket Studio. www.thistlethicketstudio.com

One last reverse applique pillow I gifted to another family member for their new home is this "All Hearts Come Home For Christmas" pillow. The wording is applied with a flocked heat-transfer vinyl. I added a black pom-pom trim around this pillow also.

I really enjoyed making all of these pillows and they were a quick and easy project. Did you make any gifts for Christmas this year?

Happy Quilting!

~Sharla


Tuesday, December 13, 2022

My Christmas Gift To You!

Merry Christmas one and all! Have you been decking the halls in preparation for the holidays? I designed a little project for Moda Bake Shop's 2022 Countdown To Christmas that's perfect for decking the halls or gifting to your loved ones. 

Christmas Lights Reverse Applique Pillow by Thistle Thicket Studio. www.thistlethicketstudio.com
My Christmas Lights Reverse Applique Pillow is a fun, quick and easy project - and it coordinates with my "A Lightbulb Moment" quilt that was featured in "The Best of Moda Bake Shop" book and the accessory projects I have shared on my blog previously.

A Lightbulb Moment Quilt by Thistle Thicket Studio Featured In "The Best Of Moda Bake Shop" Book. www.thistlethicketstudio.com
You can get your free Christmas Lights Reverse Applique Pillow pattern by visiting my pattern shop at www.thistlethicketstudio.com or by clicking here.

Wishing y'all a joyous season and we'll see you in the new year!

~Sharla


Tuesday, October 18, 2022

Halloween Stars Sew-Along: Quilt Finishing

Halloween Stars Sew-Along by Thistle Thicket Studio. www.thistlethicketstudio.com

Finally we have reached the end of the Halloween Stars Sew-Along!

To complete the quilt, layer the backing, batting and quilt top, and quilt using your preferred method. I machine quilted mine with a stars and swirl pattern using white thread. I had planned to try machine sewing my binding on, both front and back, but chickened out at the last minute. My tried and true binding method is 2 1/2" strips, folded in half, machine sewn to the front of the quilt using a 3/8" seam, folded over to the back and hand stitched down. 

Halloween Stars Sew-Along by Thistle Thicket Studio. www.thistlethicketstudio.com

I love how my little quilt turned out and look forward to using it on my table.

Thanks to everyone who joined me in this sew-along. Be sure to share your finished Halloween Stars quilt photos and tag me!

Happy Quilting!

~Sharla


Monday, October 17, 2022

Halloween Stars Sew-Along: Top Construction

Halloween Stars Sew-Along by Thistle Thicket Studio. www.thistlethicketstudio.com

We finally get to assemble our blocks to make our Halloween Stars Sew-Along quilt top! 

Halloween Stars Sew-Along by Thistle Thicket Studio. www.thistlethicketstudio.com

You'll lay out your blocks, alternating the A & B blocks in a grid according to the size you are making. Continuing to pin those open seams when they meet is important for matching seams. It's always so exciting to get to this flimsy stage!

Share a photo of your finished quilt top when you get there & tag me on Instagram or Facebook so I can see please!

Happy Quilting

~Sharla


Saturday, October 15, 2022

Halloween Stars Sew-Along: Stripe Attachment

Halloween Stars Sew-Along by Thistle Thicket Studio. www.thistlethicketstudio.com

Yay! We are getting so close to the finish line of the Halloween Stars Sew-Along! Today we are completing our blocks by attaching the last 4-patch and stripe units.

Halloween Stars Sew-Along by Thistle Thicket Studio. www.thistlethicketstudio.com

You'll be attaching the units to both the A and B blocks. It's pretty straight forward and won't take long. Just remember to pin those open seams to get a perfect match!

Halloween Stars Sew-Along by Thistle Thicket Studio. www.thistlethicketstudio.com

With the blocks completed, tomorrow we'll be sewing our blocks together to complete our top - or as some quilters call it, our 'flimsy'. (I just love that name!)

If you'd like to make your own Halloween Stars quilt, you can get the pattern we are using (called Valiant) HERE.

Happy Quilting!

~Sharla


Friday, October 14, 2022

Halloween Stars Sew-Along: Star Assembly

Halloween Stars Sew-Along by Thistle Thicket Studio. www.thistlethicketstudio.com

Today for the Halloween Stars Sew-Along, we're assembling the star portion of the blocks. I'm deviating slightly from the pattern and going to make the star portion of both the A and B Blocks today instead of completing Block A today and Block B tomorrow. But you can do it either way, your choice.

I sat down to sew and decided to assemble all the star portions of the block in one sitting while was on a roll. To sew the star units, I laid the squares, 4-patches and star point units in a 9-patch grid, and sewed across to make rows, then sewed the rows together. Easy peasy!

Halloween Stars Sew-Along by Thistle Thicket Studio. www.thistlethicketstudio.com

Tomorrow I'll add the stripes to all the blocks.

How will you sew your blocks together? Will you follow the pattern and make all the A blocks before moving on to the B blocks or will you assemble all the star portions of the blocks, then add the stripes? Either way, we'll be finished soon!

Happy Quilting

~Sharla

P.S. We're using the Valiant Quilt Pattern for this sew along, which is available in my pattern shop HERE.


Thursday, October 13, 2022

Halloween Stars Sew-Along: Small Star Points

Halloween Stars Sew-Along by Thistle Thicket Studio. www.thistlethicketstudio.com

Today for the Halloween Stars Sew-Along, we are making the small star points and then joining them with the large star points.

The small star points use the stitch and flip technique. Just like the large star points you'll be making both right and left units.

Halloween Stars Sew-Along by Thistle Thicket Studio. www.thistlethicketstudio.com

Tomorrow, we'll be starting the bulk of the sewing, just in time for the weekend!

Again, it's not too late to join in the fun! Get the pattern we are using for this sew-along, the Valiant quilt pattern, from my pattern shop HERE.

Happy Quilting!

~Sharla

www.thistlethicketstudio.com


Wednesday, October 12, 2022

Halloween Stars Sew-Along: Large Star Points

Halloween Stars Sew-Along by Thistle Thicket Studio. www.thistlethicketstudio.com

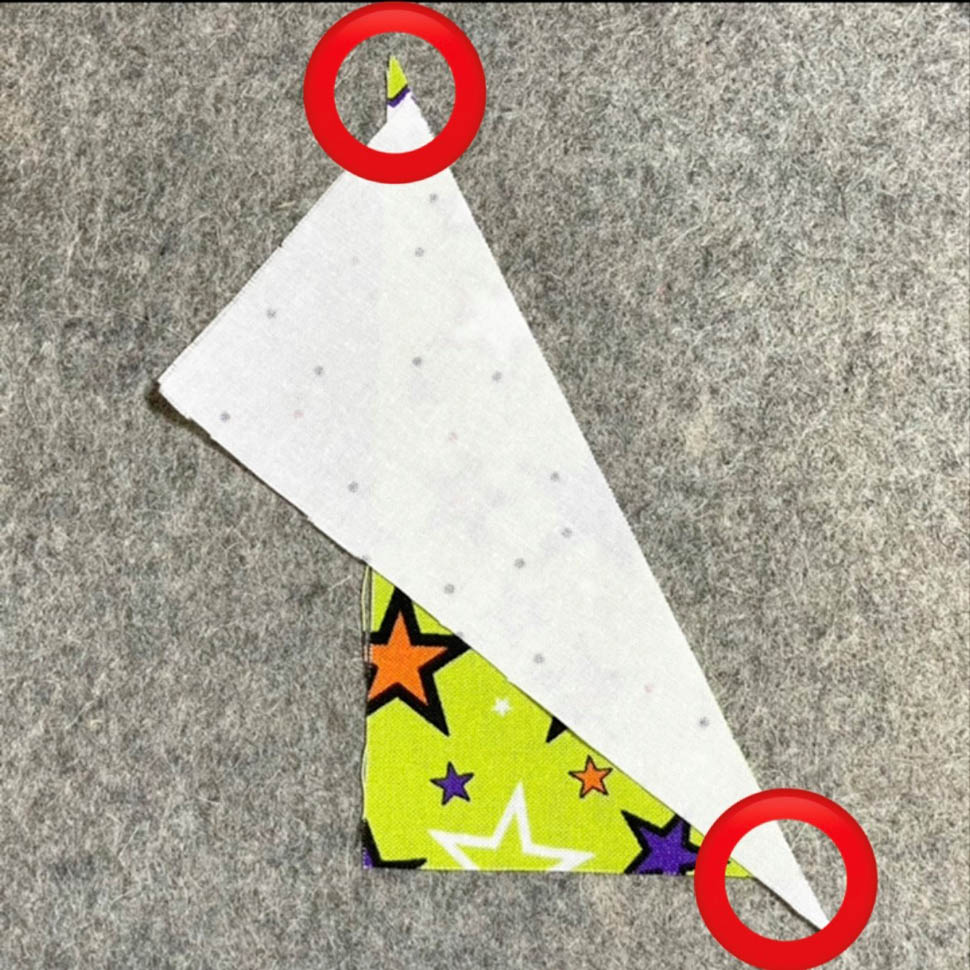
It's day 3 of the Halloween Stars Sew-Along and today we are making half square rectangles for the large star points.

The key to making HSRs is to extend the tips of the triangles past each other when sewing them together. See the red circles in the photo.

Halloween Stars Sew-Along by Thistle Thicket Studio. www.thistlethicketstudio.com

I've included a template in the pattern to trim the half square rectangles. I just cut the template out and taped it to the corner of my ruler to use.

Place the angled line on the template on top of the HSR seam then trim the first two sides. Rotate the HSR 180 degrees, line up the edges of the template with the two trimmed sides and the angled line on the seam, and trim the remaining two sides. 

Halloween Stars Sew-Along by Thistle Thicket Studio. www.thistlethicketstudio.com

You'll be making both left and right HSRs for the A and B blocks of the quilt.

How are you coming on your Halloween Stars quilt? It's not too late to join this sew-along! You can get the Valiant quilt pattern by visiting my pattern shop HERE. And you really don't even have to make a Halloween quilt. Make a patriotic quilt like the pattern, or a Christmas quilt or a celestial quilt.....the possibilities are endless!

Until tomorrow, Happy Quilting!

~Sharla


Tuesday, October 11, 2022

Halloween Stars Sew-Along: 4-Patches & Stripes

Halloween Stars Sew-Along by Thistle Thicket Studio. www.thistlethicketstudio.com
Now that we have our fabric cut, let's get started sewing for the Halloween Stars Sew-Along! Today we're going to make the 4-patches and stripes. 

Halloween Starts Sew Along Pressing Tips by Thistle Thicket Studio. www.thistlethicketstudio.com
One of the most important things to remember in these steps is to Press not Iron! To get flat, crisp, straight seams on your strip sets, remember to....

    1. Press to set the seam before opening the strip set.

    2. Open the strip set and place on the pressing surface right-side down.

    3. Finger press the seam open.

    4. Make sure seam is straight.

    5. Press seam open with iron.

    6. Spritz seam with starch.

    7. Give seam a final press.

Halloween Stars Sew-Along by Thistle Thicket Studio. www.thistlethicketstudio.com
Here's a tip for cutting the 4-Patch and Stripe segments: Make sure your strip set is straight by placing a line of your ruler over the seam of the strip set. Adjust the strip so the seam is straight and lays directly under the ruler line before cutting the segments. This will ensure your segments are square.

Halloween Stars Sew-Along by Thistle Thicket Studio. www.thistlethicketstudio.com
I love pressing to the dark side then nesting seams for that perfect match but that isn't always possible. In the Halloween Stars Sew-Along, we'll be pressing some seams open. How do you get perfectly matching seams when there's no seams to nest? Pin, Pin, Pin!

I hope these tips helps to take your quilting up a notch! See you back here tomorrow to sew the large star tips!

Happy Quilting

~Sharla

P.S. It's not too late to join in the Halloween Stars Sew-Along! We're using the Valiant quilt pattern in this sew-along and you can get it from my pattern shop HERE.