Wednesday, August 24, 2022

Rollin' Along

Boy, this summer has rolled right on past me! Where has the time gone? I have been busy sewing and thought I'd pop in and share one of my projects.

Moda Bake Shop Book "Rollin' Along" Featuring Thistle Thicket Studio's Quilt "Chain Links".
This spring, the third Moda Bake Shop book was released and it features projects made with jelly rolls. It is appropriately named "Rollin' Along".

"Chain Links" Quilt Designed By Thistle Thicket Studio. www.thistlethicketstudio.com
I was blessed to have a quilt included in the book called "Chain Links". It's a fun and easy quilt and the machine quilting pattern (called Modern Ogee by Anita Shackelford) really sets it off.

Moda selected their summer sew along project from the book, which was called "Family Reunion". It is a granny square medallion quilt designed by Christine Weld. The Moda Bake Shop Chefs featured in the book were co-hosts for the summer sew along.

Moda Bake Shop's Summer Sew Along "Family Reunion" Fabric Selection by Thistle Thicket Studio. www.thistlethicketstudio.com
I selected the Fig Tree Favorites fabric collection for my Family Reunion quilt.

Moda Bake Shop's Summer QAL "Family Reunion" Great Granny Square by Thistle Thicket Studio. www.thistlethicketstudio.com
Christine cleverly named each round of the quilt. The center medallion is called Great Granny block.

Moda Bake Shop's Summer QAL "Family Reunion" Granny Squares by Thistle Thicket Studio. www.thistlethicketstudio.com
The first round around Great Granny is called the Granny blocks.

Moda Bake Shop's Summer QAL "Family Reunion" Momma Blocks by Thistle Thicket Studio. www.thistlethicketstudio.comThe second round is called the Momma blocks.

Moda Bake Shop's Summer QAL "Family Reunion" Baby Blocks In Progress by Thistle Thicket Studio. www.thistlethicketstudio.com
And the last round is called the Baby blocks. Boy, there were a lot of baby blocks! Only three more sides to go!

Moda Bake Shop's Summer QAL "Family Reunion" Quilt Top by Thistle Thicket Studio. www.thistlethicketstudio.com
I haven't quilted my version of the Family Reunion quilt yet, but it's on the schedule for next week.

If you're interested in the "Rollin' Along" book, you can purchase it through Martingale Publishing HERE.

I'll try to pop in more frequently and share some of the other projects I've been working on.

Happy Quilting!

~Sharla


Monday, July 11, 2022

What's Happening In My Studio

4-Patch Blocks by Thistle Thicket Studio. www.thistlethicktstudio.com
Oh my! Has it really been over two months since I've posted on here??? I have been busy in my sewing room and on the farm but I really need to drop in more often. So, to that end, I thought I'd catch you up on what I've been up to.

Pattern Writing by Thistle Thicket Studio. www.thistlethicketstudio.com
First off, I am so excited to announce that I completed a 12-week pattern writing course taught by Amy Ellis of Amy's Creative Side. During the course, we learned how to calculate fabric requirements using industry standards, writing cut lists and instructions, pattern layouts and formatting, marketing, photography; and then all those things like tech editors vs. pattern testers and selling online vs. distributors. It was great to have someone to bounce ideas off of and someone to edit and organize how I write patterns. I met some other great pattern writers in our Zoom classes and I look forward to keeping in touch with them as we all move forward.

Valiant Quilt by Thistle Thicket Studio.  www.thistlethicketstudio.com
Best of all, I have designed and written two new patterns. I completed the pattern testing for one and it is now in top form ready to be quilted. Yay! And I am getting ready to start pattern testing the second one. I hope you stay tuned in as I will be announcing the launch of those patterns later (hoping for September!).

Family Reunion QAL with Thistle Thicket Studio. www.thistlethicketstudio.com
I'm also co-hosting Moda Fabric's Family Reunion Quilt Along using the newest Moda Bake Shop book "Rollin' Along". Most of the Chefs featured in the book are also hosting and we are all making the Family Reunion quilt from the book. It's not too late to get a copy of the book and join in the fun! Rollin' Along is available in local quilt shops or on ShopMartingale.

Commissioned Custom T-Shirt Quilt by Thistle Thicket Studio. www.thistlethicketstudio.com
I also completed a commissioned t-shirt quilt and pillow for a retirement gift for a former colleague

Flowers In The Garden at Thistle Thicket Studio. www.thistlethicketstudio.com
In between pattern designing, pattern testing, and co-hosting, I've been busy in my garden and we completed a successful wheat harvest here on the farm. I even managed to go on two shop hop day trips with quilty friends!

I'd love to hear what you've been up to lately, but I've turned off comments for awhile on my blog because of all the spam/bots. So share with me on Facebook @ Thistle Thicket Studio or on Instagram @thistlethicketstudio, or email me! 

Happy Quilting!

~Sharla


Monday, April 25, 2022

A Patriotic Finish

Flag Quilt By Thistle Thicket Studio. www.thistlethicketstudio.com
I realized I never shared the flag quilt I finished last month. I have been wanting to make this flag quilt for a couple of years and finally can mark it off my bucket list. 

I just love the colors of this quilt, it's a little modern update on the traditional red, white and blue.

Flag Quilt By Thistle Thicket Studio. www.thistlethicketstudio.com
This quilt is definitely not perfect. The aqua plaid fabric was printed soooo crooked that I wasted a lot of fabric trying to find spots of the fabric that were semi-straight. 

Flag Quilt By Thistle Thicket Studio. www.thistlethicketstudio.com
And then there is the pleat I found in the backing after the quilt was quilted, trimmed and bound. I was so upset that I didn't see it earlier. It was too late to unstitch and re-quilt that section so I pondered what to do.

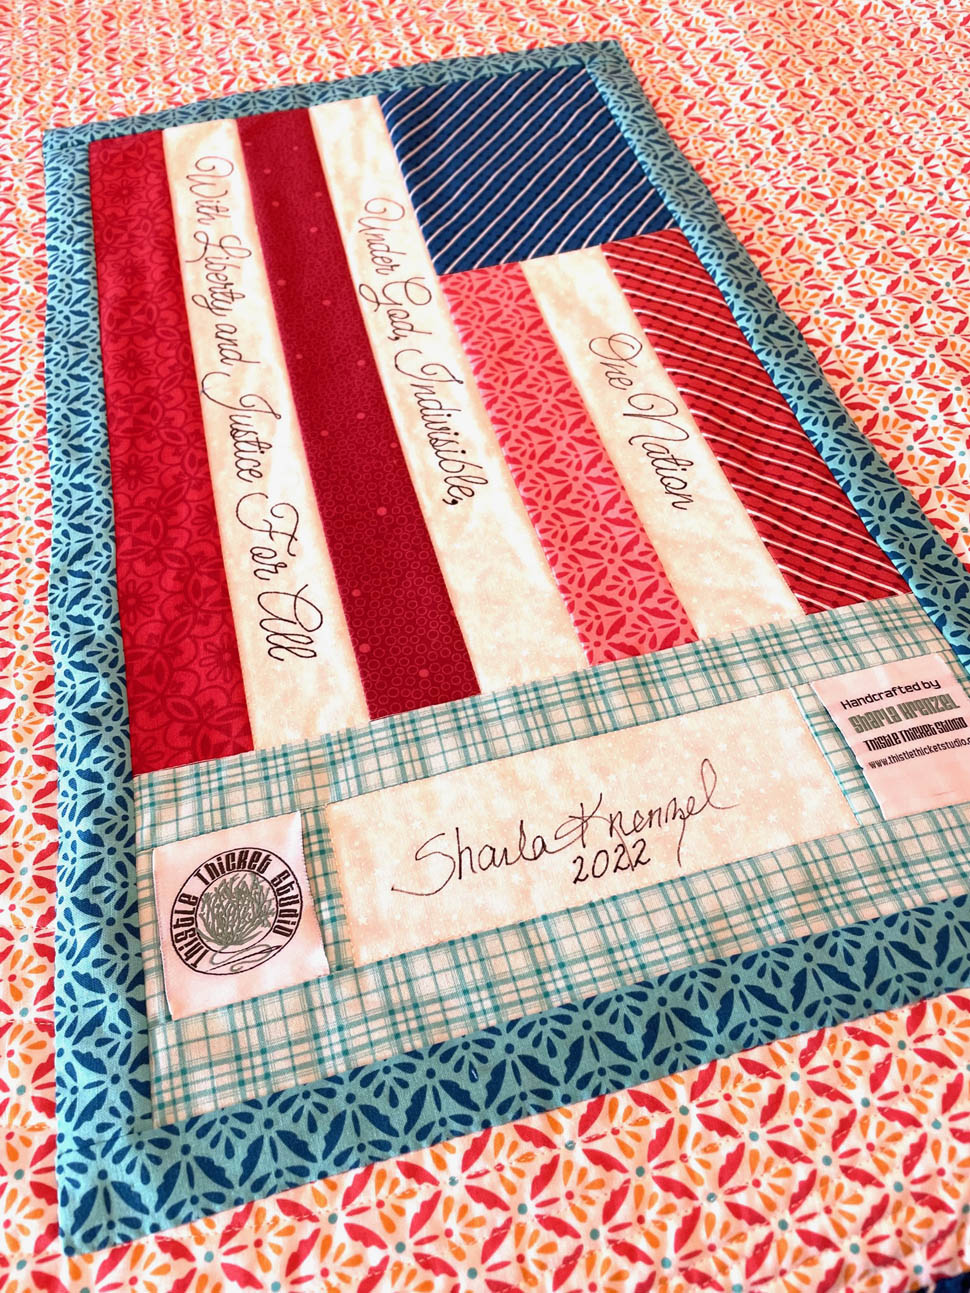
Luckily, the pleat was located in the lower corner of the quilt. But it was 15" long! My fix was to cover the pleat with a LARGE label.

Flag Quilt By Thistle Thicket Studio. www.thistlethicketstudio.com
I made another flag block and wrote a portion of the Pledge of Allegiance with a permanent marker in the white stripes of the flag. I added borders and pieced in my sew-in tag and a place to date and sign the label. Then I quilted the label to a large fusible fabric interfacing with the fusible side facing away from the label. 

Flag Quilt By Thistle Thicket Studio. www.thistlethicketstudio.com
Sewing the fusible interfacing on the back allowed me to fuse the label to the back without having the fabric label glued directly to the quilt back. The fusible also kept the center of the large label from being floppy and loose. After it was fused, I stitched the edges of the label down.

Flag Quilt By Thistle Thicket Studio. www.thistlethicketstudio.com
I'm really happy with how it turned out. This quilt was originally going to be a gift but I couldn't gift it knowing that there was that huge mistake hidden by the label. So I'll be keeping it. 

Flag Quilt By Thistle Thicket Studio. www.thistlethicketstudio.com
I think I have enough of the red and blue fabric to make more flag blocks but I'll have to find background and an aqua plaid that is straight to make another quilt.

Flag Quilt By Thistle Thicket Studio. www.thistlethicketstudio.com
I plan to display this quilt in my entry way, draped on my antique wardrobe. With that in mind, I even made a floral arrangement to coordinate with my quilt. I'll try to share a quilt when I get it all finished.

Happy Quilting!

~Sharla


P.S. I've been bombarded with spam on this site so I have turned off comments for the time being. Contact me through Facebook, Instagram or email. Thanks for understanding!


Tuesday, April 5, 2022

Whirl & Twirl Sew-Along: Quilt Reveal

Whirl & Twirl Sew Along Quilt Reveal by Thistle Thicket Studio. www.thistlethicketstudio.com
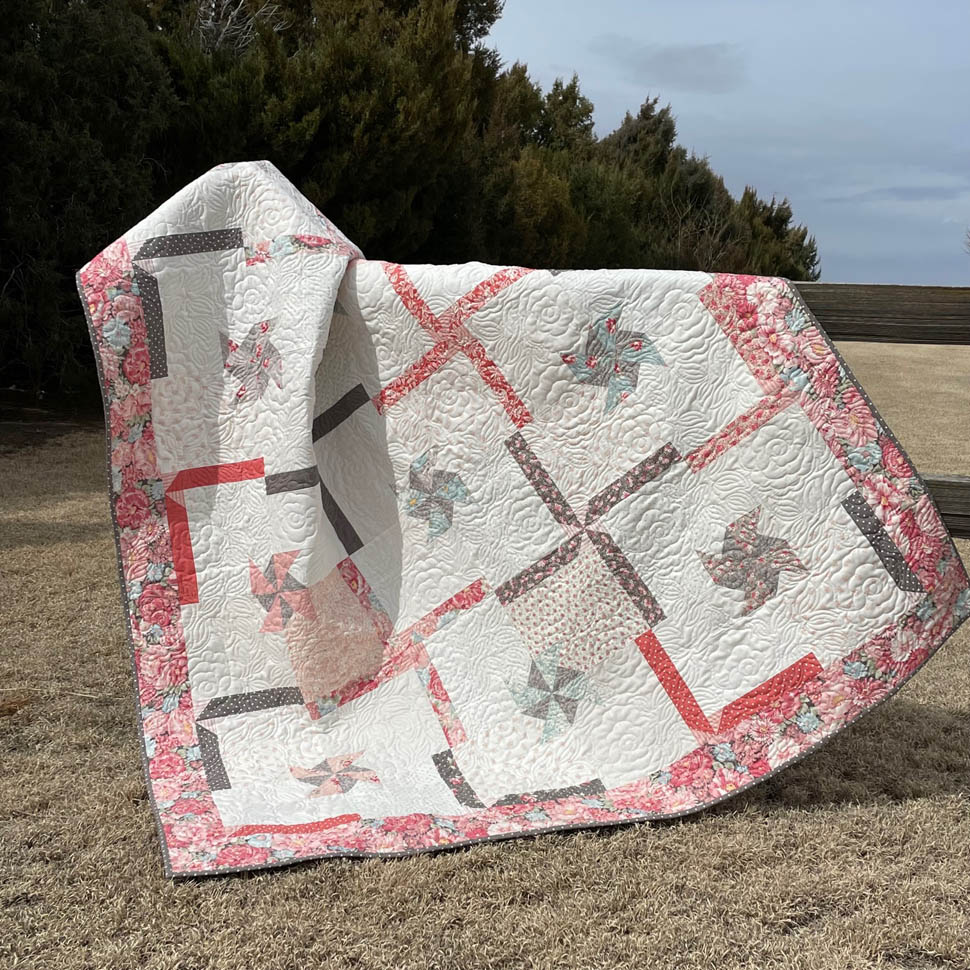
Drum roll please! Here it is....my Whirl & Twirl quilt! 

Whirl & Twirl Sew Along Quilt Reveal by Thistle Thicket Studio. www.thistlethicketstudio.com
I love how it turned out! I love the scrappy feel you get by using low volume background fabrics and a layer cake. I took a cue from the fabrics and used an all over quilting design of roses and leaves. 

Whirl & Twirl Sew Along Quilt Reveal by Thistle Thicket Studio. www.thistlethicketstudio.com
I love using the leftover layer cake squares for a pieced backing. 

You can visit my past posts during the month of March for instructions on how to make this quilt. They will remain up for a few months but I will eventually take them down and publish the pattern, so get the instructions while they are still available.

If you make a Whirl & Twirl quilt, please share on social media and tag me at Thistle Thicket Studio.

Happy Quilting!

~Sharla


Wednesday, March 30, 2022

Whirl & Twirl Sew-Along: Quilt Finish


Whirl :& Twirl Sew-Along Quilt Finish by Thistle Thicket Studio. www.thistlethicketstudio.com

Can you believe we have reached the end of the Whirl & Twirl Sew-Along?! Where did March go? Today we’re going to talk about finishing our quilts.

Backing

Whirl :& Twirl Sew-Along Quilt Finish by Thistle Thicket Studio. www.thistlethicketstudio.com

Trim the selvedge edges from the two backing rectangle pieces. Sew the two 72” x WOF backing rectangles together along the selvedge side. Backing should measure 72” x 86” (approximately). I love a scrappy back so I used my leftover layer cake squares and border strips and sewed a pieced stripe in between the backing pieces.

Quilting

Whirl :& Twirl Sew-Along Quilt Finish by Thistle Thicket Studio. www.thistlethicketstudio.com

Layer your quilt top, batting & backing. Quilt as desired. I machine quilt my quilts on a computerized longarm. The first Whirl & Twirl quilt I custom quilted with dense quilting around the pinwheels which really made the pinwheels pop. But the quilt is quite stiff. So this time I quilted an all over floral pattern for a softer touch & drape. I love both!

Whirl :& Twirl Sew-Along Quilt Finish by Thistle Thicket Studio. www.thistlethicketstudio.com

Binding

Trim the selvedges from the ends of the 8 - 2 1/2” binding strips. Sew the binding strips end-to-end at a 45 degree angle. Fold the binding in half lengthwise and press. Attach binding using your favorite method. I attach my binding by machine sewing the binding to the front using a 3/8” seam. I fold the binding over & hand stitch the binding to the back using a small ladder stitch. There are some great You Tube videos on how to miter the corners of the binding & how to connect the ends of the binding for a continuous smooth binding. I am currently working on my binding & will share photos next week (when these 50 mph wind gusts predicted for the next few days hopefully settle down!)

Please share your finished quilt using the hashtag #whirlandtwirlsewalong on Facebook and Instagram and tag me so I can see your quilts! Can’t wait!

Happy Quilting!
~Sharla


Tuesday, March 22, 2022

Whirl & Twirl Sew-Along: Quilt Assembly

WooHoo! We are on the downhill slide! Today I’m sharing the instructions to assemble your quilt top. Here we go…

Whirl & Twirl Sew-Along: Quilt Assembly by Thistle Thicket Studio. www.thistlethicketstudio.com
Step 1:

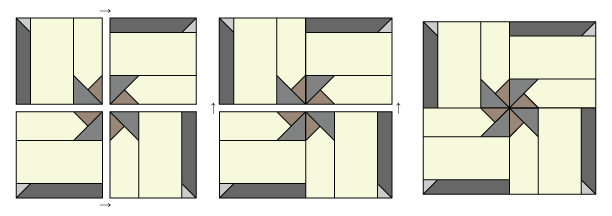
Arrange four blocks into a square with the large pinwheels in the center and blades on the outside edge. Sew two blocks together to make a row, then sew two rows together to make a large block. Press seams open. Repeat for a total of 12 large blocks.

Whirl & Twirl Sew-Along: Quilt Assembly by Thistle Thicket Studio. www.thistlethicketstudio.com
Step 2:
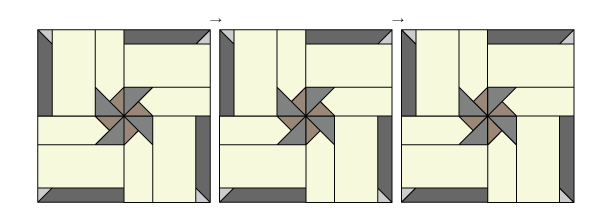
Sew three large blocks together in a row. Press seams open. Repeat for a total of four rows.

Whirl & Twirl Sew-Along: Quilt Assembly by Thistle Thicket Studio. www.thistlethicketstudio.com
Step 3:
Sew the four rows together. Press seams open. Quilt center should measure 54.5” x 72.5”.

Step 4:
Trim selvedge ends from the seven 4.5” x WOF border strips. Sew the ends together into one long strip. From the strip, cut two 4.5” x 72.5” and two 4.5” x 62.5” strips.

Whirl & Twirl Sew-Along: Quilt Assembly by Thistle Thicket Studio. www.thistlethicketstudio.com
Step 5:
Sew the 4.5” x 72.5” strips to the left and right sides of the quilt center. Press seams toward border. Sew the 4.5” x 62.5” strips to the top and bottom of the quilt center. Press seams toward border. Quilt top should measure 62.5” x 80.5”

Next week we'll complete our quilt!

Happy Quilting!
~Sharla


P.S. I've been bombarded with spam on this site so I have turned off comments for the time being. Contact me through Facebook, Instagram or email. Thanks for understanding!

Tuesday, March 15, 2022

Whirl & Twirl Sew-Along Block Construction


Whirl & Twirl Sew-Along Block Construction by Thistle Thicket Studio. www.thistlethicketstudio.com

Ready to sew your blocks for the Whirl & Twirl Sew-Along? Here we go!

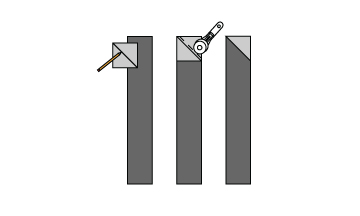
Blade: Draw a diagonal line on the back of a 2” light fabric square (blade pinwheel). With RST, layer the 2” square on top of the end of the 2” x 9.5” dark rectangle (blade) as shown. Sew on the line, trim seam allowance to ¼” and press toward pinwheel fabric.

Whirl & Twirl Sew-Along Blade Construction Diagram by Thistle Thicket Studio. www.thistlethicketstudio.com

Large Pinwheel Shadow: Draw a diagonal line on the back of a 3.5” medium solid fabric square (large pinwheel shadow). With RST, layer the square on top of the 3.5” x 9.5” background rectangle as shown. Sew on the line, trim seam allowance to ¼” and press toward pinwheel fabric.

Whirl & Twirl Sew-Along Large Pinwheel Shadow Construction Diagram by Thistle Thicket Studio. www.thistlethicketstudio.com
Large Pinwheel: Draw a diagonal line on the back of a 3.5” medium print fabric square (large pinwheel). With RST, layer the square on top of the pinwheel shadow from the previous step as shown. Sew on the line, trim seam allowance to ¼” and press toward pinwheel fabric.  

Whirl & Twirl Sew-Along Large Pinwheel Construction Diagram by Thistle Thicket Studio. www.thistlethicketstudio.com

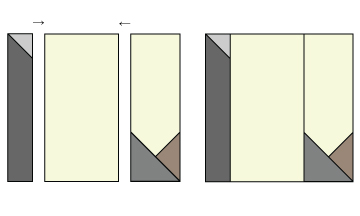
Block Assembly: Sew blade section to the left side of a 5” x 9.5” background rectangle, with blade end at the top. Press seam toward background. Sew the large pinwheel section to the right side of the background rectangle with the pinwheel end at the bottom. Press seam toward background. Block should measure 9.5” x 9.5” unfinished (9” x 9” finished). Repeat to make a total of 48 blocks.

Whirl & Twirl Sew-Along Block Assembly Diagram by Thistle Thicket Studio. www.thistlethicketstudio.com
Next week we will assemble the quilt top!

Happy Quilting!

~Sharla